How To Buy Web Hosting With Free Domain Name For WordPress Blog?

Here at Brij wala, I thought I had covered everything when it came to how to create and generate money from a successful blog. But one thing I missed was how to buy web hosting and a domain name.
Well, that changes right now.
Many new bloggers make the mistake of buying hosting from unreliable companies, and they regret this misstep later. In this step-by-step guide, I will share everything you need to know in order to buy reliable web hosting and a domain name.
For the purpose of this tutorial, I will be using Bluehost, which is an officially recommended hosting service for WordPress.
Bluehost offers free SSL certificate which is must have & also you have an option toupgrade to PHP 7.0. As a bonus, with Bluehost, you will get one free domain name. Not only will this save you money, it will also allow you to manage everything in one place.
I suggest you follow along with this guide and purchase your hosting plan and domain name as outlined here. Note: This guide is detailed, so grab a cup of coffee, and follow along closely and carefully!
Before we begin, here are a couple of things you need to have in preparation:
1. Domain Name
A domain name is like your online address. This is where your blog/website lives.
You will get one free domain name with Bluehost, or you can use any of your existing domain names if you already have one purchased. (Even if you don’t need the free domain name now, you can use it later.)
If you have not yet decided on your domain name, then You can use a free service like BustAName, or LeanDomainSearch, or NameStation to find a good domain name.
2. Payment Mode
When purchasing your web hosting and domain, you can make payment via credit card, debit card, or PayPal. Be sure to have your payment mode on hand.
A few things you should know:
Here are two guides that I recommend you read first. This will give you some basic information about web hosting, and you will learn how to save money on your web hosting purchases.
- A Beginner’s Guide To Web Hosting Packages
- How To Save Money On Web Hosting Renewals
Now let’s buy our hosting plan…
The step-by-step guide to buying a web hosting plan:
To begin, head over to Bluehost homepage and click on “get started now”.

This will take you to a page where you will see three different packages from which to choose. I will quickly explain the various packages, but you should also read this guide to get a deeper understanding of what these packages offer.

Here are my recommendations:
Unless you specifically need the Prime package, I recommend that you buy the Prime package. Even if right now you’re only hosting one site, with the Prime package, you can host unlimited sites in the future if you need to.
Click on “select” in front of the plan you have chosen.
Note: In this tutorial, I’m buying the Starter plan for 12 months. The process is the same regardless of which plan you choose.
Step 1: Choose a new (free) domain, or use an existing domain.
After selecting your plan, you can either choose to get a free domain name from Bluehost, or you can use any of your existing domain names.

Remember that you can use your free domain name later if you don’t need it now.
You can also claim your free domain at a later point. Just email Bluehost’s customer service team and they’ll help you out.
If you are using an existing domain name, you need to change the nameservers at your domain registrar to:
If you want to keep things simple, enter the domain name you wish to buy in the “new domain” field, and your free domain will be activated with the web hosting plan.
Click on “next”, and from here, the remaining steps will be very simple.
Step 2: Enter your account details.

In this section, you need to enter your details (name, email address, address, etc.).
Make sure you verify every detail, especially your email address. Your login and hosting information will be sent to your email address.
Step 3: Select the right package.
This part is crucial, and you should pay extra attention here to make sure that you are not overcharged for add-ons that you do not need.
Choose your hosting package for a 24 or 36-month term. You will notice that the price decreases as the tenure increases.
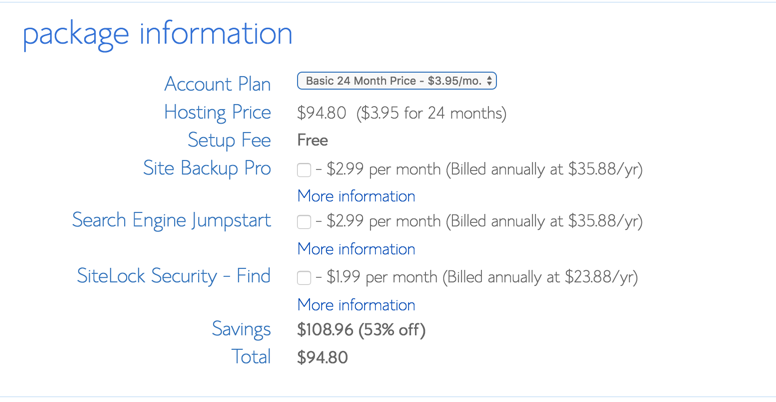
Be sure to deselect the options “Site Backup Pro” and “Sitelock Security” as you don’t really need them.
Step 4: Complete your hosting purchase.

Before you make your payment, I suggest that you scroll up and verify all of the information once again.
By default, you will see the option to make payment via credit card only, but if you want to make payment via PayPal, click on “more payment options” and it will reveal the pay by PayPal option as well.
After making payment, you will see another sales page like the one below.
Ignore this.
Click on “complete” at the end of the page.

On the next page, you will see a confirmation of your hosting package purchase, and you will see a screen like the one below.
Click on “create your password”.

Step 5: Select a password.
This is the final stage of your web hosting purchase.
You can choose a password, or you can use a password generator to create a complex password (which I recommend). Copy and paste the password in a safe place, and click on “Paste”.
Click on “Create”, and that’s it!

Now the process of buying web hosting for your blog is 98% complete.
Step 6: Log into your web hosting cPanel.
Check your email inbox, and you will find a confirmation email with all of the login information for your web hosting account. The only thing that will not be included in the email is the password you created in the last step — this is for your security.

Go to Bluehost.com, and click on “login” at the top.
In the login field, type your domain name or username and the password which you have chosen or generated.
Click “submit”.

You will now be inside of your Bluehost cPanel.

That’s it! Congratulations! You have just purchased your web hosting package and domain name.
If you have followed the steps mentioned in this article and the above two articles, you will have your WordPress blog installed, set up, and running in 30 minutes.
Did you use this guide to buy your hosting package? Did you get stuck somewhere in the middle? Let me know how it went in the comments below!
If you find this guide useful, be sure to share it with your friends on Facebook, Twitter, and Google Plus!
Comments
Post a Comment